Getting Started
If you are interested in this project or would like to contribute, please contact me at
- email: admin@oneb.tech
Create new game
To create a new game, follow these steps:
- Sign in to the LiveOps Tool.
- On the sidebar, click on Games settings.
- Click on + New game.

- Enter the game ID and game name in the provided fields.
- Press Create.
- Now you can use all features of the services
Javascript game engines
Installing
To install this package, simply type add or install @oneb-sdk/client using your favorite package manager:
npm install @oneb-sdk/clientyarn add @oneb-sdk/clientpnpm add @oneb-sdk/client
Import
The OneB SDK is modulized by clients and commands.
To send a request, you only need to import the OneBServicesClient and the commands you need, for example,CallGameScriptCommand:
// ES5 example
const { OneBServicesClient, CallGameScriptCommand } = require("@oneb-sdk/client");
// ES6+ example
import { OneBServicesClient, CallGameScriptCommand  } from "@oneb-sdk/client";
Usage
To send a request, you:
- Initiate client with configuration (e.g. gameId, environment, apiType).
- Initiate command with input parameters.
- Call
sendoperation on the client with command object as input
  //config service
  const client = new OneBServicesClient({ gameId: "DEMO" });

  //player login
  await client.login({ playerId: "oneb:test1", secretKey: "bimat" });

  //get daily rewards information
  const getDailyRewardsCommand = new GetBlueprintDataCommand("DailyRewards");
  const dailyRewards = await client.send(getDailyRewardsCommand);

  //get player profile
  const playerProfile = await client.send(new GetPlayerDataCommand('Profile'));

  console.log(dailyRewards, playerProfile)
Example
A working example is available here.
Unity engine
Installing
open Unity Package Manager (in Unity's top menu: Window > Package Manager)
Input https://github.com/tdtanvn/oneb-unity.git in Add package from Git URL
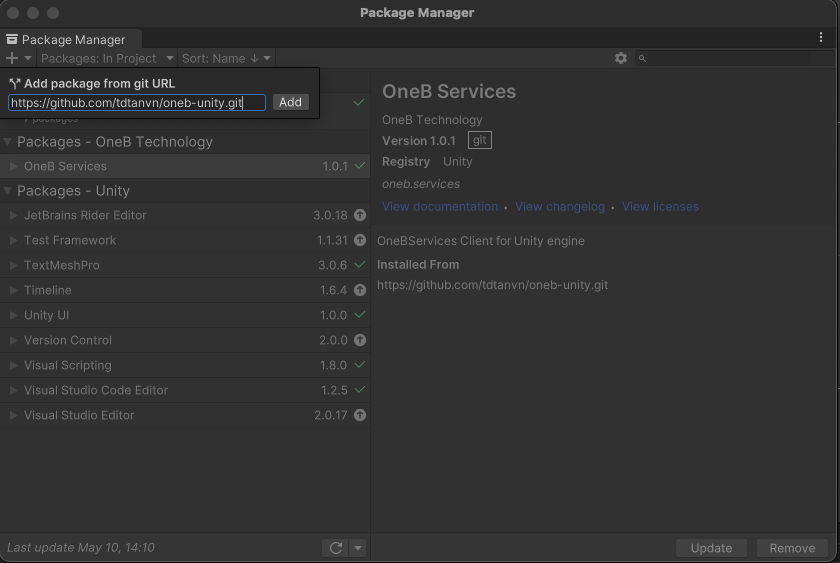
Click Add and Close the popup when done
Compile protobuf
Following this instructions to obtain *.cs file
Usage
To send a request, you:
- Initiate client with configuration (e.g. gameId, environment, apiType).
- Initiate command with input parameters.
- Call
sendoperation on the client with command object as input
using System.Collections;
using System.Collections.Generic;
using UnityEngine;
// using namespace OneB
using OneB;

public class OnlineManager : MonoBehaviour
{
    // Init client
    OneBServicesClient client = new OneBServicesClient()
    {
        GameId = "CG",
        Environment = GameEnvironment.DEVELOPMENT,
        DebugLogEnabled = true
    };

    async void Start()
    {
        // Need to call login in the first scene. only call one time while the game starting
        _ = await client.Login("RandomID", "randomSecretKey");


        // Try to get player profile
        var playerProfile = await client.Send<PlayerProfile>(new GetPlayerObjectCommand("Profile"));
        Debug.Log(playerProfile);

        // update player name
        _ = await client.Send<PlayerProfile>(new PostPlayerObjectCommand<PlayerProfileInput>("Profile", new PlayerProfileInput
        {
            PlayerName = "David"
        }));

    }
}
Example
A working example is available here.